ALUMINIUM PEDAL SERVICE INSTRUCTIONS
Tools You Will Need
- Waterproof grease, and cloth
- 8mm Hex
- 2.5mm Hex (for full bearing replacement)
- Park Tool FR5.2 Cassette tool (with no center guide)
- Crescent Wrench
- Pliers
- Flat Head Screwdriver
- Vice or Wooden Surface
- Emory Paper or Scouring pad

Pedal Clean & Grease: Approximately 15-30 minutes. Difficulty: Moderate
Recommended Service interval
We recommend you service your pedals once a season, twice a season if you ride everyday, or anytime you feel your pedals are no longer spinning smoothly.
COMPLETE EXPLODED VIEW & PARTS LIST

STEP 1: REMOVE PEDAL & FLANGE WASHER
Pull off the flange washer (3) from the end of the axle by hand, with pliers or flat head screwdriver. You can pry the flange washer (3) off with a screwdriver in the same way as you would open a paint can.


STEP 2: LOCKRING REMOVAL
Use a cassette lockring tool to remove the Bearing Nut (4). Engage the tool into the Bearing Nut splines. If available, use a vice to hold the cassette tool and rotate the pedal to loosen. Alternatively, secure the pedal against a wooden surface with your hand and loosen the bearing nut with the cassette tool.
LOOSENING
- Drive Side pedal - Turn wrench clockwise to loosen. (DS lock ring has a reverse thread)
- Non-Drive side pedal - Turn wrench counter clockwise to loosen. (NDS lock nut has a regular thread) The Non-drive side lock ring is denoted by a small punched dot just outside of the tool profile. Drive side ring has no dot.

STEP 3: AXLE REMOVAL
Pull axle out by hand. The axle(8) can require a firm tug. If you find it difficult to pull out the axle from the pedal body, reinstall the pedal on your crank and pull on the pedal body(5) to separate it from the axle.

STEP 4: CLEANING
Wipe off the old grease from the axle (8), bearing (2) and bushing (10) and clean out the inside of the pedal body (5).

STEP 5: IDENTIFYING YOUR PEDAL VERSION
V1 Pedal Axles have 3 Micro bearings on the narrow end of the axle.
V2 Pedal Axles have a Brass Bushing on the narrow end of the axle.
See diagram below:
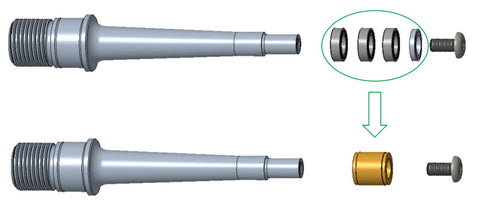
If you Have the 3 micro bearings and washers we recommend getting the Aluminium Pedal Rebuild Kit: SP1C0063 and replacing the micro bearings and washers with the updated brass bushing.
STEP 6: REMOVING BUSHING
To remove the brass bushing (10), use a 8mm hex to hold the axle (8) and a 2.5mm hex to remove the pedal axle bolt (6).
- The drive-side pedal axle bolt (black) has a left hand thread, turn clockwise to loosen.
- The non-drive-side pedal axle bolt (silver) has right hand thread, turn counter-clockwise to loosen.


STEP 7: REMOVING BEARING
To remove the bearing (4) simply slide it off the end of the axle (8).

STEP 8: INSPECTION
Check your brass bushing (10) and axle (8) for wear.
Bearing:
Check your bearings spin smoothly. If they are rough or stiff then we recommend you replace them.
Bushing:
Check the inside of the bushings for scoring. If they are not smooth we recommend you replace them.
If you need to replace your bearings or bushings please purchase the this kit: Aluminium Pedal Rebuild Kit: SP1C0063
STEP 9: CLEAN AXLE
Check the end of the axle (8) for brass residue from the bushing (10). The tip should be shiny silver.
If the axle tip has discoloration, scouring or rust, use a scouring pad or fine emery paper to polish the silver surface. Wipe the axle clean and ensure there are no metal particles left behind.


STEP 10: GREASE AXLE
Grease all the outer surfaces of your axle (8). It is most important to grease the silver surfaces where the bearing (2) and bushing (10) sit.


STEP 11: INSTALL BUSHING AND BEARING, COMPLETE GREASING
Install the bushing (10) and bearing (2) back onto the freshly greased axle (8). Slide the bearing on by hand. Use an 8mm hex to hold the axle and a 2.5mm hex to tighten the pedal axle bolt (6). Be sure to select the correct axle bolt.
- The drive-side pedal axle bolt (black) has a left hand thread, counter-clockwise to tighten.
- The non-drive-side pedal axle bolt (silver) has a right hand thread, turn clockwise to tighten.
Once the bushing, axle bolt and bearing are installed, grease the outer surfaces of both the bearing and bushing.

STEP 12: INSTALL AXLE
Press the axle (8) back into the clean pedal body (5) by hand. If an air lock is created while pressing in the axle, lightly wiggle the axle to release air caught within the pedal body.

STEP 13: INSTALL LOCK RING
Engage the cassette tool into the bearing nut (4) and turn by hand at first. Once threads are in, tighten the bearing nut with your cassette tool, holding the pedal with a vice or on a piece of wood with your hand. Take care not to overtighten the bearing nut. If the axle (8) is not rotating smoothly or if it feels gritty, lightly tap on the end of the axle with a mallet. If it still feels gritty, try backing off the bearing nut slightly.
- Drive-side pedal bearing nut has a reverse thread - Turn counter-clockwise to tighten.
- Non-drive-side pedal bearing nut has a regular thread - Turn clockwise to tighten. The Non-drive side lock ring is denoted by a small punched dot just outside of the tool profile. Drive side ring has no dot.


STEP 14: INSTALL FLANGE WASHER
Clean or replace the pedal seal (7) and push it back onto the pedal flange washer (3). The lip of the pedal seal should face the bearing (2), with the flange facing outward towards the crank arm. Push the flange washer into place on the axle (8) by hand.

STEP 15: INSTALL PEDAL
Lightly grease the pedal threads. Using your 8mm hex tool, slowly thread the pedal into the crank. Ensure it is threading in easily and is straight. Be careful not to cross the threads, as you will damage your crank and pedal. If it is difficult to install, do not force it, remove the pedal and try again.

Note:
The OneUp Aluminum pedals should spin freely after freshly servicing.
If your pedals still feel stiff or gritty after servicing, check that the pedal body is not binding on the crank arm. If you can not see a gap between the crank arm and pedal body we recommend you add a pedal washer. Do not run 2 or more pedal washers.
OneUp Aluminium pedals are not compatible with crank boots unless you trim them to clear the pedal body.
Congratulations, you have now successfully serviced your Pedals.
NOW GO RIDE!
If you are having any problems please first double check that you have correctly completed each of the above steps.
If you are still having trouble please email us at support@oneupcomponents.com for help. Please include a detailed description of your issue. Photos are often helpful.
Thanks,
![]()