EDC THREADLESS CARRIER INSTALL INSTRUCTIONS
Things You Will Need
- OneUp V2 EDC Tool (V1 EDC [green] Tool is NOT compatible)
- OneUp EDC Threadless Carrier
- Hollow Cassette Tool or 15mm Socket (For star nut removal)
- 10mm Wrench [Ratchet optional] (For star nut removal)
- 4mm Hex (Ratchet optional)
- Ruler or tape measure
- Eye protection
Assembly time, approximately 10-15 minutes. Difficulty: Moderate.

Your EDC Threadless Carrier kit contains the following pieces:
(It does not include the EDC Tool)
- Threadless Carrier (The Telescope)
- Lower Cap (Large Black Saucer)
- 4 x Install bolts (Socket Cap Screws)
- Star nut removal bolt and washer (Hex head bolt)
We recommend that you read ALL steps of the install process before you begin.
If you are installing EDC Threadless on an already assembled bike you do not need to loosen your stem/headset.
If you are building a bike you can still follow all the steps below. But you will need to tighten your headset at the end of the installation process.
INSTALL INSTRUCTIONS
STEP 1: ENSURE YOUR FORK IS COMPATIBLE - VERY IMPORTANT
Incompatible forks: Fox 38 with oval steerer (use a EDC Threaded install), Rock Shox 35 forks, Giant Overdrive 2 Forks. Cannondale Lefty Forks. Carbon Steerers
STEERER TUBE LENGTH
Most forks are compatible, except for a small number of forks with very short steerer tubes. For the following cases your fork steerer tube length must meet the minimum length requirement.
- Fox except Fox 38 = 190mm min
- RockShox Forks = 220mm min
- All other compatible forks = 190mm min
Measure from the underside of your fork crown to the top of your spacer stack, or top of your stem if you are not running any spacers above your stem.

STEP 2 : REMOVE THE LOWER O-RING FROM YOUR V2 EDC TOOL
Please note, the V1 EDC Tool (Green Multi-tool) cannot be used with the Threadless Carrier
For the Threadless Carrier EDC install option you can install your V2 EDC Tool with either the small storage capsule or no capsule.
Please remove the lower O-ring and larger storage capsule from your V2 EDC Tool. These cannot be used with the EDC Threadless Carrier. You can remove the O-ring by hand or you can use your EDC tool to help. Locate the recess/notch in the plastic carrier and use the 2mm on your EDC tool to pry the O-ring out of the groove.

STEP 3 : REMOVE STAR NUT
If you already own a OneUp EDC Tap Kit you can use the Star Nut Puller which was included. If you don’t have the Star Nut Puller please follow the steps below.
If you are uncomfortable with this step it is recommended you get a professional Bicycle mechanic to remove the star nut for you.
Remove your Top Cap and Steerer Bolt.

Use the supplied M6 Bolt and Washer and either a hollow cassette tool Park FR 5-2 or ¼” drive 15mm Socket to pull out the center portion of your star nut.

Place the cassette tool or socket on top of your star nut. Then screw the steel hex head bolt into your star nut. Use a ratchet wrench or regular wrench to tighten the bolt and pull out the center portion of the star nut.
If, in this process you find the washer is bending and making it difficult for your chamfered socket head to catch the nut, We recommend adding a second washer or using a spanner instead of your socket.

Then use a flat head screwdriver and mallet to remove the 2 star pieces. Lightly tap one side of the star piece down, to flip it vertically and then pull it out with pliers. Repeat for the second star piece. Wear eye protection for this step.
STEP 4: CHECK STEERER TUBE CLEARANCE
Ensure you have at least 3mm of clearance between the top of your steerer tube and the top of your spacer or stem, just like a regular stem/headset installation.
STEP 5: DETERMINE WHICH OF THE 4 INSTALL BOLTS TO USE (2 OPTIONS)
Option 1: Measure (Same dimension as Step 1)
Measure from the underside of your fork crown to the top of your spacer stack, or top of your stem if you are not running any spacers above your stem. Then select the correct bolt length from the table below.
|
|
Undersize of crown to top of spacer stack
|
|
|
Bolt length
|
Min (mm)
|
Max (mm)
|
|
40
|
185
|
205
|
|
60
|
205
|
225
|
|
80
|
225
|
245
|
|
100
|
245
|
265
|
Option 2: Use the Bolt Range Guide lasered on the Threadless Carrier

- Install the 80mm Bolt into the Lower Cap. (See Step 5)
- Hold the lower cap in place under your fork crown and drop the Carrier into your steerer from above, so that the bottom of the Threadless Carrier sits on top of the bolt (See Step 6)
- Check the top of your steerer tube or spacer stack is in between the lasered lines on the Carrier when the bolt is touching, but has not been threaded in to the carrier.
- If out of the lasered range, repeat with a longer or shorter bolt until you are within the range.
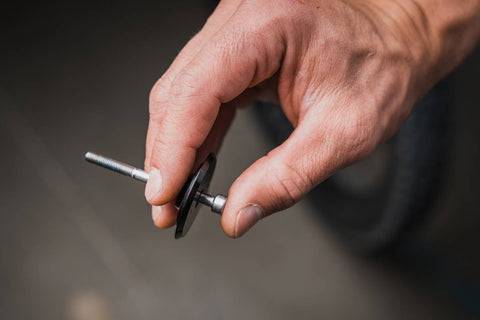
STEP 6: ASSEMBLE THE BOLT AND LOWER CAP
Insert the correct length bolt into the Lower Cap. The Lower Cap has an O-ring in the counterbore which holds the bolt in place. If you cannot easily assemble the bolt add some grease under the head of the bolt.
STEP 7: THREAD THE BOLT & LOWER CAP ASSEMBLY INTO THE THREADLESS CARRIER
Hold the lower cap assembly against the bottom of your fork crown. Next, drop the Threadless Carrier into the top of your steerer tube. Align the bolt with the tip of the Threadless Carrier. It may take a few attempts for you to find the thread on the threadless carrier. Hold the bolt with one hand, using your other hand rotate the Carrier clockwise until the bolt is hand tight. It is easier to turn the carrier to tighten than to use a tool.

Assemble the Bolt and Lower Cap Assembly into the bottom of your fork crown

Hold the Cap and Bolt in this position (Hand not shown)

While holding the Cap and Bolt against your fork crown, rotate the threadless carrier clockwise until hand tight.
STEP 8: INSERT YOUR EDC TOOL AND ALIGN THE TEARDROP CAP
The V2 EDC Tool is keyed to the Carrier and only can be assembled in 1 orientation. If you cannot slide your EDC Tool fully into the carrier, rotate the tool until you find the key slot.
Insert your EDC Tool into the Threadless Carrier and align the carrier so that the teardrop cap of your EDC Tool is pointing in the desired direction. The OneUp logo on the top of the EDC Tool is horizontal when the teardrop is pointing towards the driveside.

STEP 9: TIGHTEN THE THREADLESS CARRIER BOLT
Once hand tight, hold the top of the carrier in place to maintain your desired EDC tool alignment and tighten the lower cap bolt with a 4mm Hex until tight 2Nm max.
Be careful not to scratch your fork stanchions with your tool when tightening.
If/when you need to tighten your headset use the same preloading process as you would for a star nut. Loosen your stem’s steerer tube bolts and then tighten the Threadless Carrier Bolt located underneath your fork crown until you have the correct headset preload. Then re torque your stem steerer tube bolts.

Congratulations, you have now successfully installed your EDC Threadless Carrier.
NOW GO RIDE!
If you are having any problems please first double check that you have correctly completed each of the above steps.
If you are still having trouble please email us at support@oneupcomponents.com for help. Please include a detailed description of your issue. Photos are often helpful.
Thanks
OneUp